Intoduction
Pyxnet is a python (py) library targetted at creating virtual networks (net) using SDN (Software Defined Networking) technology. The x in the
name is for the crossover thing.
Its main application is for testing software behaviour in a given environment, or external devices
like embedded devices. This tool is structured in such a way that it is simple to integrate in
automated test environments, and that created network topologies are easy to export in
documentation.

Pyxnet goals
Installation
You can install this package via pip:
| |
Dependencies
This library depends on the following elements:
- Linux only
- openvswitch must be installed, and the following commands must be available:
ovs-vsctlovs-dpctlovs-ofctl
- iproute inerface is made using the pyroute2 library;
- graphviz allows graph generation.
Defining a network topology
General principles
A network topology is defined using the following elements:
- Topology objects;
- Links between objects’ endpoints.
For instance, let’s take the following topology:
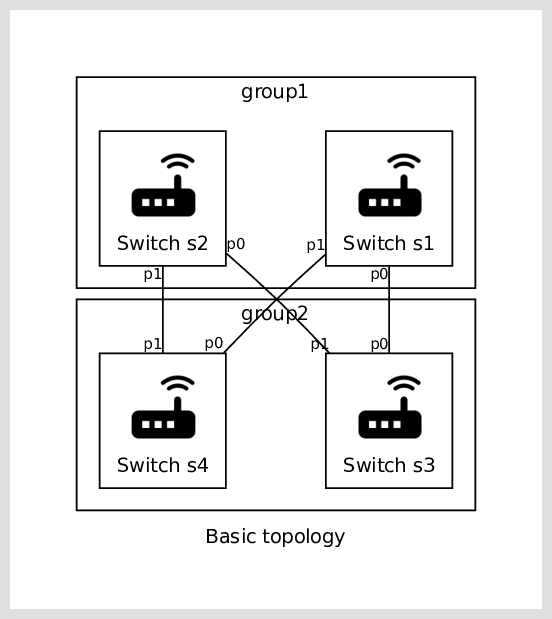
Example topology (examples/basic_topology.py)
Topology objects are the four switches s1, s2, s3 and s4, each switch
have two endpoints p0 and p1. Each link is symbolized by a solid line on the graph.
The python code generating this topology is fairly straightforward:
| |
This example is available in the examples/basic_topology.py file. We can
see here that after the toplogy object is created, the toplogy is defined by
registering objects into our toplogy, then linking them together. Objects can
be grouped in logical groups for easier representation.
Endpoint types
Each toplogy object defines endpoints, which are the points that can be linked together in order to define how objects are linked together. This corresponds for instance to a switch’s port. Each endpoint can have the following type:
Virtual: the endpoint exists in the virtual world, e.g. inside the host machine;Real: the endpoint exists in the real world, e.g. outside the host machine;Phy: the endpoint is an interface on the host machine, e.g. a usb/phy dongle, or a port on an ethernet card.
This type definition implies the following statements:
- All the network topology can be defined using
virtualandrealobjects; - A virtual endpoint cannot be linked directly to a real endpoint. There mst be a phy interface in-between.

Real and virtual objects (examples/real_objects.py)
As specified, the user is relieved of concerns regarding implementation details, the necessity of defining specific objects, and whether they need to be instantiated on the Linux machine or not. This approach ensures that the generated graph comprehensively represents the tested topology.
On the above figure, existing links in the virtual world are represented using solid lines, whereas real world ones are represented using dashed lines. This means that when instanciating, real links have no real effect on what’s happening inside the linux host.
Defining a custom object
Defining a custom object is straightforward, as it is classed based. Here is an example of how to define a custom switch with two ports:
| |
Key elements here are:
- Each network object has an unique name;
- the
export_graphviz()method exports the object on a graphviz diagram. The google material is included in this package.
To define a network object from scratch, you can derive the PyxNetObject class. The following methods can be defined:
instanciate(self): implements how the object is instanciated on the linux platform;remove(self): implements how the object is removed from the linux platform;up(self): implements how the object is bring up on the the linux platform;down(self): implements how the object is bring down on the linux platform;export_graphviz(self,dot): implements how the object is represented on a graphviz diagram.
Roadmap
Here are some planned features:
- Possibility of easily integrating third-party software, such as a tftp server, using iproute’s
namespace; - Similarly, possibility to connect to docker containers and networks.